A Simple Mutation
In this section, you’ll learn how to add a mutation to your GraphQL API. This mutation will allow you to post new links to the server.
Creating a mutation for adding new links
Like before, you need to start by adding the post mutation in Nexus. You will define both the mutation signature along with its resolver.
Let’s see what’s going on with the numbered comments:
// 1: You’re extending theMutationtype to add a new root field. You did something similar in the last chapter with theQuerytype.// 2: The name of the mutation is defined aspostand it returns a (non nullable)linkobject.// 3: Here you define the arguments to your mutation. You can pass arguments to your GraphQL API endpoints (just like in REST). In this case, the two arguments you need to pass aredescriptionandurl. Both arguments mandatory (hence thenonNull()) because both are needed to create a newlink.// 4: You’re now using the second argument that’s passed into all resolver functions:args. Any guesses what it’s used for? … Correct! 💡 It carries the arguments for the operation – in this case theurlanddescriptionof the link to be created.// 5:idCountserves as a very rudimentary way to generate newidvalues for ourlinkobjects. Finally, you add your newlinkobject to thelinksarray and return the newly created object.
Understand everything? Take some time if you need to.
After you’re ready, try a small experiment:
Experiment: Change the
return link;at the end of theresolvefunction toreturn null;. You’ll see that your IDE raises an error. This is because you defined the return type of thepostGraphQL endpoint/field to be a non nullablelinkobject. Return anything else except alinkobject in the resolver, and the Nexus generated types will immediately catch the violation!
Testing the mutation
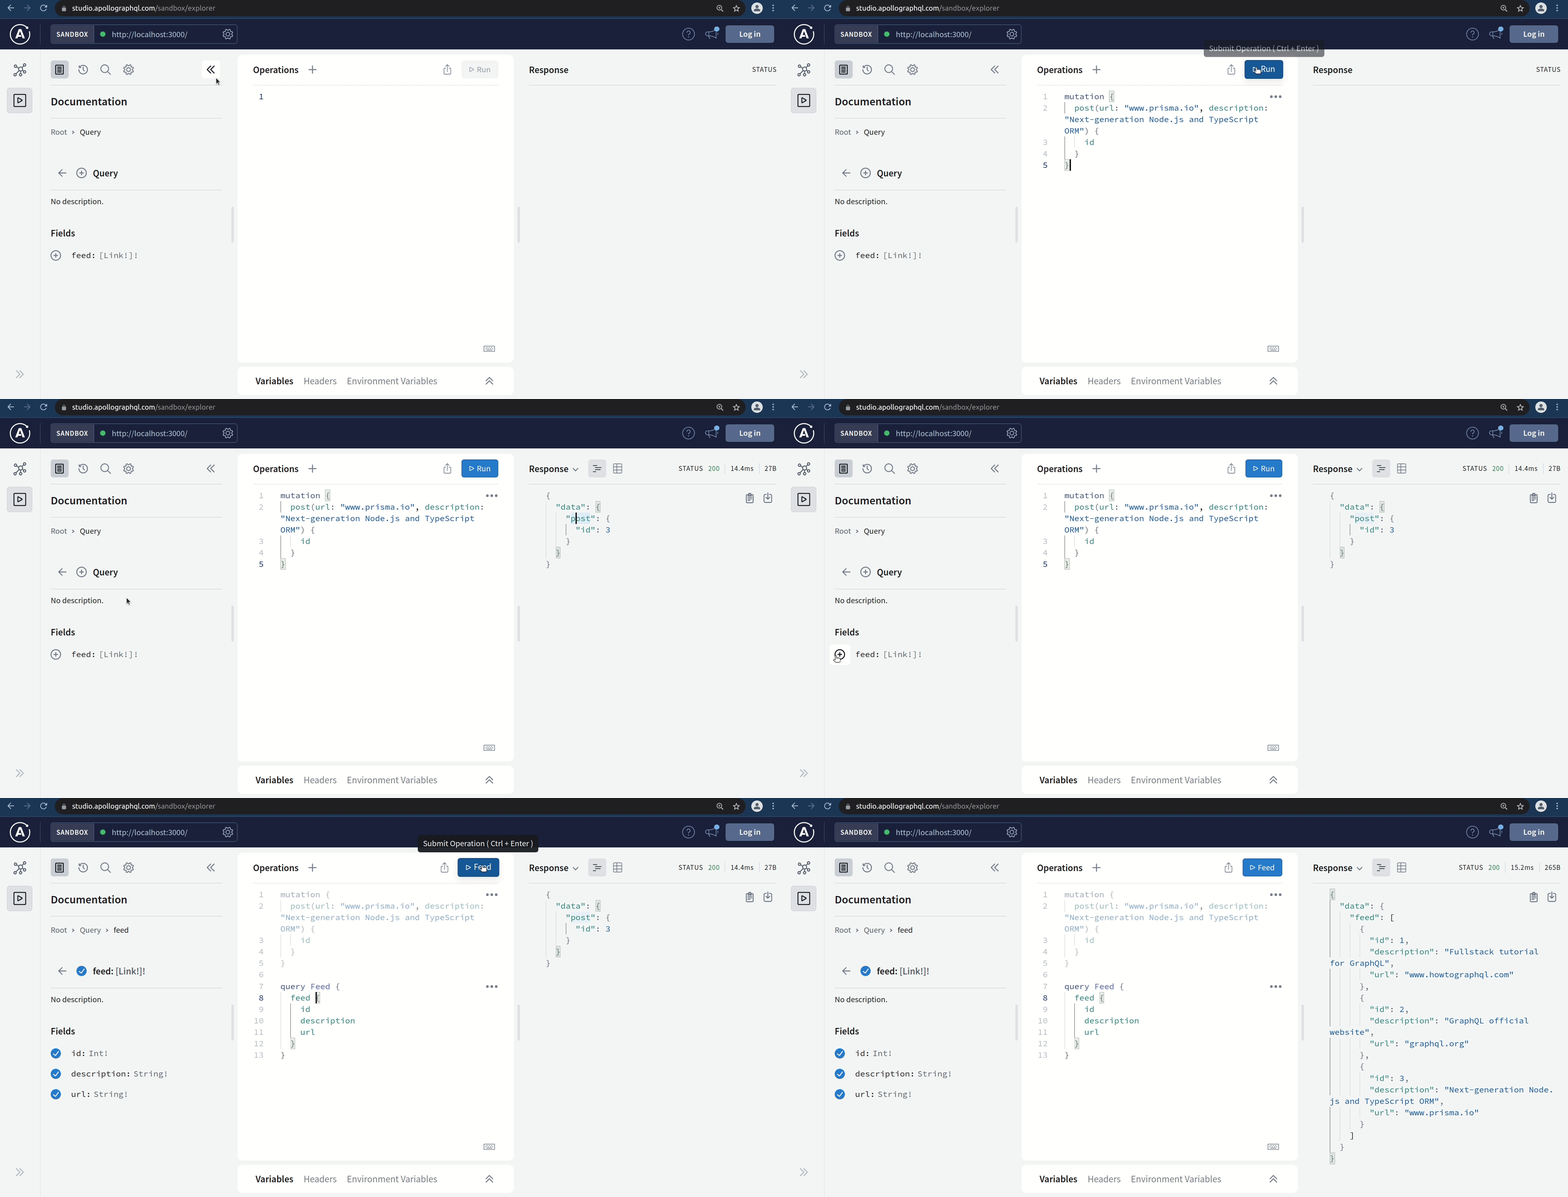
Let’s head over to Apollo Studio to test the new API operation. Here is a simple mutation you can send to test things out:
mutation {
  post(url: "www.prisma.io", description: "Next-generation Node.js and TypeScript ORM") {
    id
  }
}
The server response should look as follows:
{
  "data": {
    "post": {
      "id": 3
    }
  }
}
With every mutation you send, the idCount will increase and the following IDs for created links will be 4, 5, and so forth…
To verify that your mutation worked, you can send the feed query from before again — it now returns the additional Link that you created with the mutation:

However, once you kill and restart the server, you’ll notice that the previously added links are now gone and you need
to add them again. This is because the links are only stored in-memory, in the links array. In the next sections,
you will learn how to add a database to the GraphQL server in order to persist the data beyond the runtime of the
server.
Note: When a GraphQL query or mutation has arguments (like the
postmutation you just executed), you will need to pass concrete values for the arguments. There are two ways of reading values from the client. The first is the inlined method, where you pass the variable data directly in the query (this is what you just used). The other method involves passing data through variables. In this method the API call and the data are separated from each other. The abovepostmutation, rewritten to use variables, would look like this:mutation($description: String!, $url: String!) { post(description: $description, url: $url) { id } }With the variables being passed separately like this:
{
  "description": "www.prisma.io",
  "url": "Next-generation Node.js and TypeScript ORM"
}
Apollo Studio tends to prefer the variable method. It supports code completion through variables and has a separate Variables tab in the bottom to define the variables. However, for copy-pasting convenience, this tutorial will follow the inline method. If you’re manually typing up the commands, feel free to use the method which is most convenient for you.
Exercise
If you want to practice writing more code with Nexus and implementing GraphQL resolvers, here’s an optional challenge for you. Based on your
current implementation, extend the GraphQL API with full CRUD functionality for the Link type. In particular,
implement the queries and mutations that have the following definitions:
type Query {
  # Fetch a single link by its `id`
  link(id: ID!): Link
}

type Mutation {
  # Update a link
  updateLink(id: ID!, url: String, description: String): Link!

  # Delete a link
  deleteLink(id: ID!): Link!
}
The Nexus documentation might come in handy when attempting this excercise.